TCAdmin2 advanced module for WHMCS
This software comes as is and no support for the module will be provided by TCAdmin. TCAdmin support is limited to the TCAdmin software.
Requirements
- You must have a fully installed, licensed and configured TCAdmin control panel. This includes game files, automation setup and email templates.
- Fully installed and configured WHMCS installation.
- PHP curl extension enabled.
Download
The tcadmin2_advanced module can be downloaded from our client area.
WHMCS module features
- Supports the following WHMCS module commands:
- Create: Create game and voice servers automatically. Game switching is supported.
- Suspend/Unsuspend/Terminate: Automatically suspend/enable/delete game and voice servers.
- Change Package: Update a game/voice servers private status, branding and slots.
- Change Password: Change the client's TCAdmin password from within WHMCS.
- Direct client login from WHMCS to TCAdmin.
- Configurable options and custom fields can be used to set all the TCAdmin billing API attributes. This makes it flexible. You configure your packages exactly the way you want them.
Configure your packages to ask your clients for their game server's location, hostname and passwords in the WHMCS order page.
TCAdmin billing API configuration settings
Configure TCAdmin according to the Billing API configuration page.
WHMCS Module Installation and Configuration
Installing the Files
- Extract the contents of the
tcadmin2_advanced.zipfile to the path/whmcs-root/modules/servers/tcadmin2_advancedin your WHMCS installation.
Adding the TCAdmin Server
- Log in to WHMCS.
- Go to
Configuration>Products/Services>Serversand Click on Add New Server. - Enter the server
name,hostname,ip address,port, select server typetcadmin2_advancedand enter the admin login and password that will be used. If you don't use a hostname to access your control panel (cp.yourdomain.com:8880) enter your website's ip address (xxx.xxx.xxx.xxx:8880) in the hostname field.
Creating Products in WHMCS
Create your product according to the WHMCS documentation. Configure with custom fields and configurable options to ask for location, hostname, slots, etc.
Module settings
The most common attributes can be configured in the module settings tab. Other attributes can be configured in the file specified in the "Config File" field. The default config file is "default_values.php". You can use a config file that has different values depending on the configuration that is required for each product. Assign a "Custom Field" or "Configuration Option" from the list next to each attribute. When the module command is executed the tcadmin attribute will take the value of that field or option.
Why are your dropdowns empty? You need to configure your product with custom fields or configurable options for hostname, location, slots, etc. Then you will see them in the dropdowns.
![]()
-
Config File
- The file that contains the default values used for the TCAdmin billing API.
- Contains more options not shown (commandline parameters, service level, game switching, etc).
- Default file:
default_values.php
-
Game ID
- The game id that will be created.
- If blank, a game server will not be created.
-
Game Slots
- Number of slots for the game server.
- If blank, a game server will not be created.
- Can include prefixes PRI and PUB for private or public servers.
- Example: PRI8 for a private server with 8 slots.
-
Game Private
- 1 if the game server is private, 0 if public.
- Default: 0.
-
Game Branded
- 1 if the game server is branded, 0 if not.
- Default: 0.
-
Game Datacenter
- Datacenter id where the game server will be created.
- Required for game server creation.
-
Game Hostname
- Hostname of the game server.
- Automatically generated if datacenter is specified.
-
Game RCon Password
- RCon password for the game server.
- Automatically generated if not specified.
-
Game Private Password
- Private password for the game server.
- Automatically generated if not specified.
-
Voice ID
- Voice id that will be created.
- For Teamspeak 2 virtual server, use TEAMSPEAK.
- For Teamspeak 3 virtual server, use TEAMSPEAK3.
- If blank, no voice server will be created.
- For TEAMSPEAK3, upload and download quotas can be sent.
-
Voice Slots
- Number of slots for the voice server.
- If valid voice id provided and this is blank, it uses game_slots.
- Can include prefixes PRI and PUB for private or public servers.
- Example: PRI8 for a private server with 8 slots.
-
Voice Branded
- 1 if the voice server is private, 0 if public.
- Default: 0.
-
Voice Datacenter
- Datacenter id where the voice server will be created.
- Required for voice server creation.
-
Voice Hostname
- Hostname of the voice server.
- Automatically generated if not specified.
-
Voice RCon Password
- RCon password for the voice server.
- Automatically generated if not specified.
-
Voice Private Password
- Private password for the voice server.
- Automatically generated if not specified.
-
Reseller Packages
- To create reseller packages, leave game and voice info blank.
- Set "Config File" to "reseller_values.php".
- Create the file in tcadmin2_advanced folder with specified lines.
<?php
  include('default_values.php');
 $billing_api_values["role_id"]="3"; //The reseller role id to assign to the user.
 $billing_api_values["package_id"]="1"; //The reseller package id to assign to the user.
?>
Advanced Configuration (Optional)
Config File (default_values.php)
To configure attributes that are not on the Module settings edit file default_values.php located in \whmcs\modules\servers\tcadmin2_advanced. You can configure them to take the value of a Custom Field, Configuration Option or a fixed value.
- To configure it to use a
Custom Fieldset the value toCustomField:FieldName
CustomField:Hostname
- To configure it to use a
Configuration Optionset the value toConfigOption:OptionName
ConfigOption:Slots
$billing_api_values["game_additional_slots"] = "ConfigOption:Extra Slots";
Sending Custom Variable Values
You can specify custom variable values directly by using the following formats. The variable name is case sensitive. If custom variable values are not specified the default value will be used.
$billing_api_values["gamevar_VariableName"] = "ConfigOption:ReservedSlots";
$billing_api_values["voicevar_VariableName"] = "CustomField:VoiceCodec";
$billing_api_values["gamevar_Xms"] = "2048";
$billing_api_values["gamevar_Xmx"] = "2048";
Sending Allowed Games for Game Switching
Use game_id_switch_# to specify the game ids that the service can be switched to. For example this allows the game server to switch to game ids 10, 20, 30.:
$billing_api_values["game_id_switch_1"]=10;
$billing_api_values["game_id_switch_2"]=20;
$billing_api_values["game_id_switch_3"]=30;
Game Switching from WHMCS
Instead of sending the values explained above, you can switch the game directly from WHMCS by sending a different value for game_id from the WHMCS upgrade/downgrade function. To do this, go to the product's configuration. In the Upgrade tab select the allowed games. When the user upgrades his package the game server will be reinstalled with the new game.
Optionally, you can send game_delete_on_switch=1 to delete the game server and create a new one. This way it will go through the process of finding a different server according to your billing API configuration.
Custom Config File
In some cases you might need to set different API values or execute custom code for a specific game. To use different config files for a game you can create a new text file with .php extension in the tcadmin2_advanced folder with these lines. Set the name of the custom file in your product's module settings.
<?php
  include('default_values.php');
  //Your code here
?>
Examples
The following example sets the game slots to a fixed value of 100. The Xmx and Xms variables are set to 2048 (2GB). All the other values configured in default_values.php are left the same. Upload to the tcadmin2_advanced folder. In the product's module settings configure this file as the config file instead of default_values.php.
<?php
  include('default_values.php');
  $billing_api_values["game_slots"] = 100;
  $billing_api_values["gamevar_Xms"] = "2048";
  $billing_api_values["gamevar_Xmx"] = "2048";
?>
Don't start the game server after it has been created.
<?php
  include('default_values.php');
  $billing_api_values["game_start"] = 0;
?>
The following example sends a different game id depending the location selected by the client. You must have a custom field named Location.
<?php
include('default_values.php');
switch ($params["customfields"]["Location"])
{
case "1":
  $billing_api_values["game_id"] = 11;
  break;
case "2":
  $billing_api_values["game_id"] = 12;
  break;
}
?>
Set CPU priority to above normal.
<?php
  include('default_values.php');
  //Valid values are: Idle BelowNormal Normal AboveNormal High RealTime
  $billing_api_values["game_priority"] = "AboveNormal";
?>
Set CPU and memory limits.
<?php
  include('default_values.php');
  $billing_api_values["game_cpu"] = "75";
  $billing_api_values["game_memory"] = "2048";
?>
Minecraft Example
Create a configurable option named Ram with values 512MB, 1GB, 1.5GB. The values of slots, Xms and Xmx variables are set depending on its value. Create a config file in the tcadmin2_advanced folder named minecraft.php with these lines. In the product's module settings set the config file to minecraft.php.
<?php
include('default_values.php');
switch ($params["configoptions"]["Ram"])
{
case "512MB":
  $billing_api_values["gamevar_Xms"] = "512";
  $billing_api_values["gamevar_Xmx"] = "512";
  $billing_api_values["game_slots"] = 12;
  break;
case "1GB":
  $billing_api_values["gamevar_Xms"] = "1024";
  $billing_api_values["gamevar_Xmx"] = "1024";
  $billing_api_values["game_slots"] = 20;
  break;
case "1.5GB":
  $billing_api_values["gamevar_Xms"] = "1512";
  $billing_api_values["gamevar_Xmx"] = "1512";
  $billing_api_values["game_slots"] = 35;
  break;
case "2GB":
  $billing_api_values["gamevar_Xms"] = "2048";
  $billing_api_values["gamevar_Xmx"] = "2048";
  $billing_api_values["game_slots"] = 40;
  break;
}
?>
Create a reseller package
- Create a reseller package in settings > reseller packages. In the list of reseller packages you can find the package id that you will need for the WHMCS configuration.
- create a file named reseller.php in the tcadmin2_advanced folder with these lines:
<?php
  include('default_values.php');
  //Your code here
  $billing_api_values["role_id"]="3";
  $billing_api_values["package_id"]="12345";
?>
- Change the value of role_id to the reseller role id (default reseller role id is 3)
- Change the value of package_id to the id of the package you want to assign.
- Select your reseller product in WHMCS. In the module settings tab set the config file to reseller.php
Other configuration parameters
-
game_start / voice_start
- Start the service after it has been created.
- Allowed values are 1 and 0.
- The default value is 1.
-
game_startup / voice_startup
- Specify the service's startup.
- Allowed values are Automatic, Manual, Disabled.
- The default value is Automatic.
-
game_additional_slots / voice_additional_slots
- Value added to game_slots.
- Default value is 0.
-
game_priority / voice_priority
- Specify the CPU priority.
- Allowed values are Idle, BelowNormal, Normal, AboveNormal, High, RealTime.
- The default value is Normal.
-
game_server / voice_server
- Specify the server id for service creation.
- Can be used instead of game_datacenter.
-
game_cpu / voice_cpu
- Specify a value from 1 to 100 (Windows) or 1 to (100 x number of processors) (Linux).
- See Limit Service CPU and Memory Usage (Windows).
- See Limit Service CPU and Memory Usage (Linux).
-
game_memory / voice_memory
- Specify the max allowed memory in MB.
-
game_virtual_memory / game_virtual_memory
- Specify the max allowed virtual memory in MB (Windows only).
Specifying Different Module Value and Display Value
In WHMCS, you can configure dropdowns and radios to send a different value to the module than the one that is displayed in the order form. This is useful because you must send ids to the TCAdmin billing api but you want to show a friendly name to the client. The module value and display value are separated by the pipe character "|". The format is ModuleValue|DisplayValue For example: You can create a dropdown list that has the locations New York and Dallas but you want the billing api to receive the datacenter ids 1 and 2. You can create a Custom Field of type Drop Down with these options: 1|Dallas,2|NewYork
Troubleshooting
- The values sent to TCAdmin are saved in the log file
/home/tcadmin/Logs/Web/BillingApi.LastCommand.logorC:\Program Files\TCAdmin2\Logs\Web\BillingApi.LastCommand.logMake sure TCAdmin is receiving the correct values. The values required to create a game server are: game_id, game_slots, game_datacenter. - If TCAdmin accepts the values a scheduled task is created. If the game server is never created go to System > General Settings > Scheduled Tasks. Select the Day view and click on the task that was created. You should see the error message preventing the game server from being created. Correct the problem and start the task again. You don't need to send the command from WHMCS again.
Update Products and Services from tcadmin to tcadmin2_advanced
If you are going to keep the same custom fields and configurable options in your products you need to follow these steps:
- Update the module settings in the product. Switch from tcadmin to tcadmin2_advanced module and map the required tcadmin attributes to custom fields and configurable options.
- Update the server field in the client's service.
If you are going to change custom fields and configurable options we recommend you create a copy of the product and modify the copy (Duplicate link at the top of the products page). When the new product is ready go to the client's service. Change the package and server. Enter the correct values again and save.
After you change the package all the values of custom fields and configurable options for that service will be lost and you will not be able to recover them.
To enable direct client login from WHMCS to TCAdmin you must configure the serviceâs username and password. To disable this feature leave the username and password fields blank.
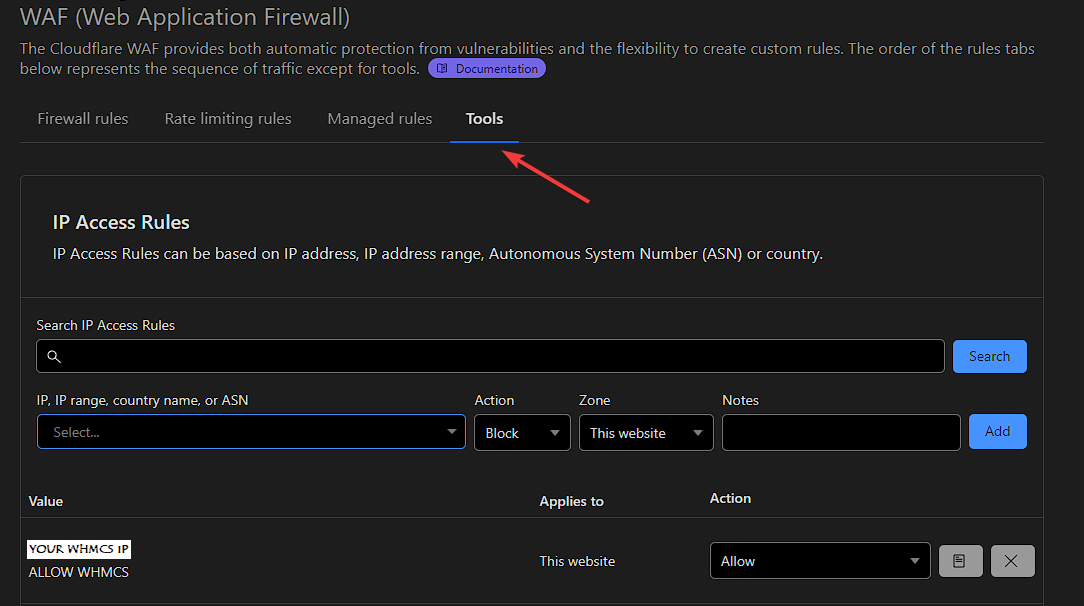
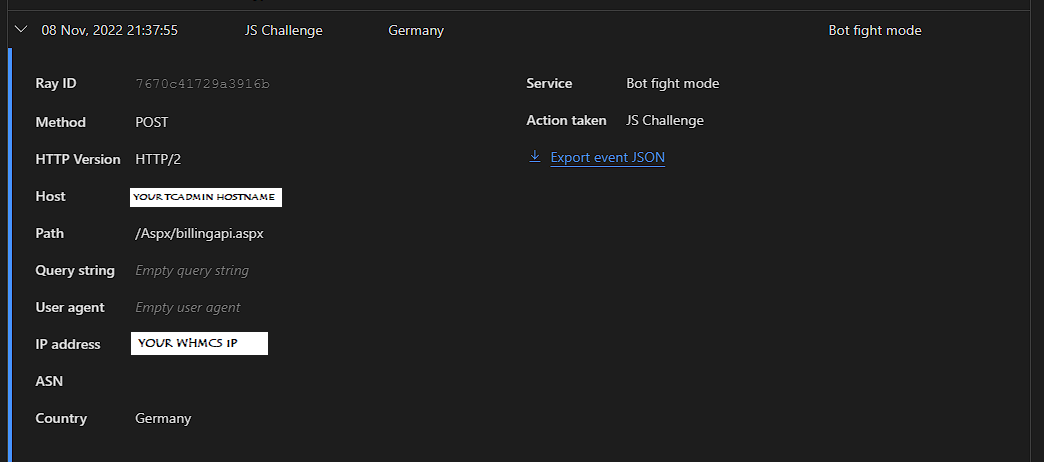
Cloudflare
If Cloudflare is blocking requests to the billing api go to the Cloudflare control panel > Security > Web Application Firewall (WAF) > Tools and allow your WHMCS IP.