MVC Templates
MVC Templates allow you to edit the HTML for all or each individual page. If you only want to edit colors of the theme see MVC Themes.
Features
Editable HTML templates:
- Create a new theme in
Settings>Themes. Set the type to MVC. A folder will be created inTCAdmin2\ControlPanel.MVC\Viewswhere you can place your custom.cshtmland images. - Your custom template folder only needs to have the files that have been modified.
- If a file doesn't exist in your custom template it will use the file from
~/Views/Default/.Use the same directory structure as the Default template. - You can safely add new files to the default template folder but all the original files will be overwritten when you update TCAdmin.
- To translate MVC templates go to
Settings>Languages>select the language>Other Components>Resources.*.
The following features are configurable in the game settings
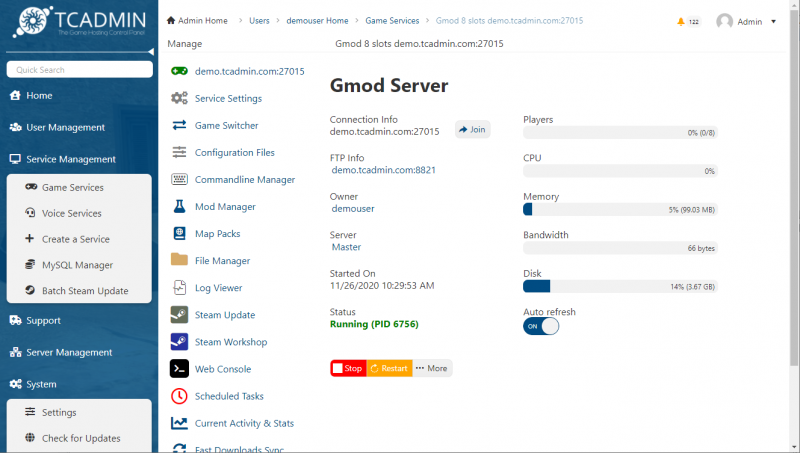
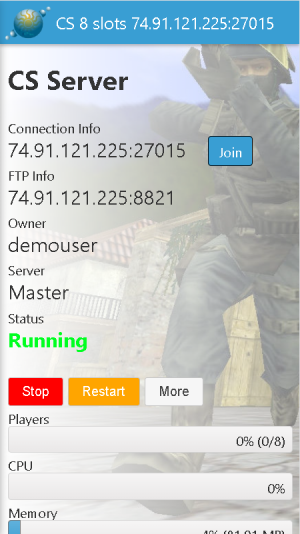
- Custom service home page template per game. (change whole layout of the service home page)
- Custom status template per game. (change which information and ports are displayed)
- Join URL
Requirements
.NET 4.7.2(Windows) orMono 6.x(Linux) must be installed on your server.- Install TCAdmin version
2.0.127.0or greater.
Configure TCAdmin
New installations already have MVC enabled by default
- Edit
TCAdmin2\Monitor\TCAdminMonitor.exe.configor/home/tcadmin/Monitor/TCAdminMonitor.exe.config. Add these lines under<appSettings>(update them if they already exist).
<add key="TCAdmin.Public.MVC" value="True" />
<add key="TCAdmin.Public.MVC.WebServicesPath" value="../ControlPanel.MVC" />
- Restart the monitor service.
Https is not supported by the built in web server when TCAdmin.Public.MVC is set to True. To use https you must configure your control panel with Nginx.
Update the WHMCS module (optional)
Make a backup of your /whmcs/modules/servers/tcadmin2_advanced/tcadmin2_advanced.php and replace it the one included in the tcadmin2_advanced module for MVC. This module has the links updated to work with the MVC template format. You can download the module from the client area
Linux Nginx configuration (optional)
Configure Nginx with these instructions Configure TCAdmin to run with Nginx
Windows IIS configuration (optional)
Configure the website in IIS with these instructions: Configure TCAdmin to run with IIS
Edit Templates in Visual Studio 2017/2019
- Go to
settings>Themes>Create a new MVC theme. This is the template that you will be editing in Visual Studio. - Copy
TCAdmin2\ControlPanel.MVCandTCAdmin2\Monitor\Sharedto your PC. - Rename
ControlPanel.MVC\Web.VS2017.configtoControlPanel.MVC\Web.config - Edit
ControlPanel.MVC\Web.configin notepad.
We recommend Visual Studio Code for all configuration edits that need to be made.
- Update the value of
TCAdmin.SharedPathto the correct path. - Update
TCAdmin.Database.MySql.ConnectionStringwith your MySQL info. If the connection string is encrypted use these lines and changeMYSQLIP,MYSQLUSER,MYSQLPASSWORDandMYSQLDBwith the correct values. You can connect to your master's database or to a local copy.
<add key="TCAdmin.Database.MySql.ConnectionString" value="Data Source=MYSQLIP;User Id=MYSQLUSER;Password=MYSQLPASSWORD;Database=MYSQLDB;Pooling=false;Compress=false;Connection Lifetime=900;Connect Timeout=30;Protocol=TCP" />
<add key="TCAdmin.Database.MySql.ConnectionString.Encrypted" value="False" />
Run Visual Studio
- select
File>Open>Web Site. Select your ControlPanel.MVC folder. - Select
Website>Start Optionsfrom the menu. - In Build > Before running startup page select
No buildand click on OK. Depending on your Visual Studio version this might be inBuild>Configuration Manager>Uncheck build next to the website. - You should be able to run the solution and it will load the control panel website.
Only MVC content will render correctly. Classic ASP.NET content will show a server error.
- Don't edit the files from the default template. To edit a specific page copy it from
ControlPanel.MVC\Views\DefaulttoControlPanel.MVC\Views\(YourTemplate)keeping the same directory structure. You don't need to copy all files. If a file is not in your template the default file will be used. - You should have full intellisense support when editing the template files. If you see an errors about missing references copy the file from Shared to
ControlPanel.MVC\binand restart Visual Studio.
Edit Templates with a text editor
We recommend Visual Studio Code for all configuration edits that need to be made.
- Create a new theme in
Settings>Themes. Set the type to MVC. A folder will be created inTCAdmin2\ControlPanel.MVC\Viewswhere you can place your custom.cshtmland images. - Copy the file you want to customize from
TCAdmin2\ControlPanel.MVC\Views\DefaulttoTCAdmin2\ControlPanel.MVC\Views\(YourTemplate). You must keep the same directory structure of the original file. For example to customize the login page copyViews\Default\Base\Login\Index.cshtmltoViews\(YourTemplate)\Base\Login\Index.cshtmland editIndex.cshtmlwith a text editor.
Adding code to existing .cshtml file without modifying it
Each .cshtml file in TCAdmin2\ControlPanel.MVC\Views\Default supports adding server and client side code using plugin files. The plugin filename should be OriginalFile.Plugin.AnyName.cshtml.
if you want to add code to the HTML HEAD for a live chat software:
- The default HEAD code is in
TCAdmin2\ControlPanel.MVC\Views\Default\Shared\_Head.cshtml - To add your code as a plugin you need to create a file
TCAdmin2\ControlPanel.MVC\Views\Default\Shared\_Head.Plugin.LiveChat.cshtml
Going back to the classic ASP.NET themes
If you want to go back to the classic ASP.NET themes:
Permanently:
- Edit C:\Program Files\TCAdmin2\Monitor\TCAdminMonitor.exe.config or /home/tcadmin/Monitor/TCAdminMonitor.exe.config and set the value of TCAdmin.Public.MVC to False
- Restart the monitor.
Temporary:
- Log out from the MVC panel. View
http://x.x.x.x:8880/Aspx/(the / at the end is important) Then log in again.